If you’re looking for a natural and water-efficient way to keep your garden thriving, the olla irrigation system is worth exploring. This ancient technique, used for centuries in arid regions, delivers water right where plants need it most—at the roots—while conserving water and reducing your workload.
Let’s break down how it works, why it’s so effective, and how you can start using it in your own garden.
Benefits of Olla Irrigation
This simple system offers a range of advantages that make it a smart solution for modern sustainable gardening.
Water Conservation
Olla irrigation uses up to 70 percent less water compared to traditional surface watering methods. The clay pot slowly releases moisture as the soil around it dries, minimizing waste from evaporation and runoff.
Low Maintenance
Once set up, it’s easy to manage. Most gardeners only need to refill their ollas every few days, depending on weather conditions and plant needs.
Healthier Plants
Because water is delivered slowly and directly to the roots, plants develop deeper, stronger root systems. This leads to improved growth and better resistance to drought.
Fewer Weeds
Only the area immediately around the olla receives moisture. That means weeds in the surrounding soil are less likely to sprout and spread.
Environmentally Friendly
Ollas are typically made from natural, unglazed clay. They’re non-toxic, biodegradable, and free from the plastics or chemicals used in many irrigation systems.
How to Set Up an Olla System
Installing an olla in your garden is straightforward. Here’s how to do it.
1. Choose the Right Olla
You can purchase a pre-made olla from a garden center or online, or make your own using two unglazed terracotta pots sealed together at the bottom. The key is that the clay must be porous and unglazed so water can seep through it.
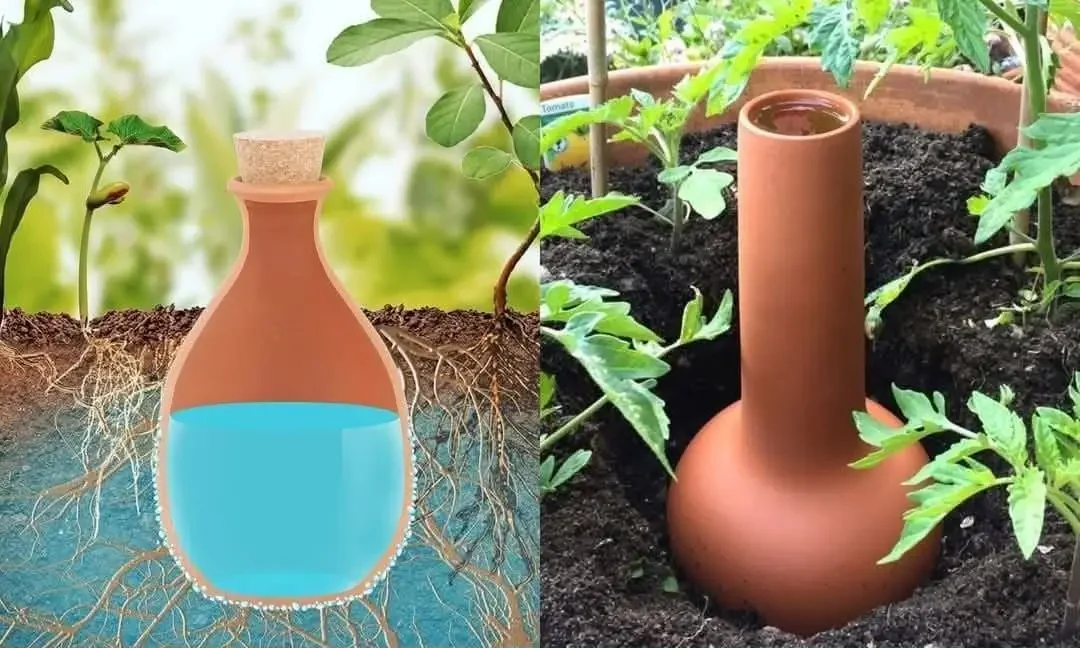
2. Bury the Olla
Dig a hole and place the olla in the soil with only the neck exposed above ground. Position it near the base of your plants, ideally within 18 to 24 inches of their root zones.
3. Fill with Water
Once buried, fill the olla with water. It will gradually release moisture as the surrounding soil dries, maintaining a consistent moisture level in the root zone.
4. Cover the Opening
Place a lid, flat stone, or tile over the top of the olla to reduce evaporation and prevent debris or insects from getting in.
5. Refill as Needed
Depending on temperature, rainfall, and plant needs, you’ll want to check and refill the olla every few days. Hotter climates may require more frequent refills.
Best Places to Use Olla Irrigation
This system is versatile and works well in a variety of garden settings.
- Raised Beds
Especially useful in urban environments or small spaces where water access is limited. - Flower and Vegetable Beds
Ollas can be placed between rows or near groupings of plants to ensure consistent moisture. - Large Containers and Planters
A great low-maintenance solution for patio or balcony gardening. One olla can keep an entire planter hydrated for days.
Final Thoughts
The olla irrigation system may be ancient, but it’s still one of the smartest and most sustainable ways to water your garden. It’s easy to set up, cost-effective, and incredibly efficient. Whether you’re growing vegetables, herbs, or flowers, ollas help you use less water while growing stronger, healthier plants.
This method is perfect for anyone looking to reduce water use, simplify their gardening routine, or make their garden more eco-friendly.
Get Started Today
Try adding an olla to your garden this season and see the difference for yourself. It’s a small change that can lead to big results—both for your plants and the planet.
For more tips on sustainable gardening and low-maintenance growing, be sure to subscribe to our newsletter or check out our other how-to guides.
Let your garden thrive the smart way.
