How to Grow Mint All Year Round Using a Simple Plastic Bottle Trick
Mint is one of the easiest and most rewarding herbs to grow, providing fresh, aromatic leaves for teas, cooking, and home remedies. The best part? With a simple trick using plastic bottles, you can grow mint all year round, even if you have limited space. This method allows you to create a self-watering system that keeps mint thriving with minimal effort. Follow this step-by-step guide to growing fresh mint continuously, using recycled plastic bottles for an eco-friendly and efficient gardening solution.
Why Use Plastic Bottles to Grow Mint?
Using plastic bottles as planters or self-watering systems has several advantages:
- Water Efficiency: Helps retain moisture, reducing the need for frequent watering.
- Space-Saving: Ideal for small apartments, balconies, or indoor gardening.
- Sustainability: Repurposes plastic waste into useful gardening tools.
- Portability: Easy to move plants around for optimal sunlight exposure.
What You Need to Get Started
Before you begin, gather the following materials:
- A 2-liter plastic bottle (or larger)
- Mint cuttings or seeds
- Potting soil rich in organic matter
- A sharp knife or scissors
- A drill or nail for drainage holes
- Watering can or spray bottle
Step-by-Step Guide to Growing Mint in Plastic Bottles
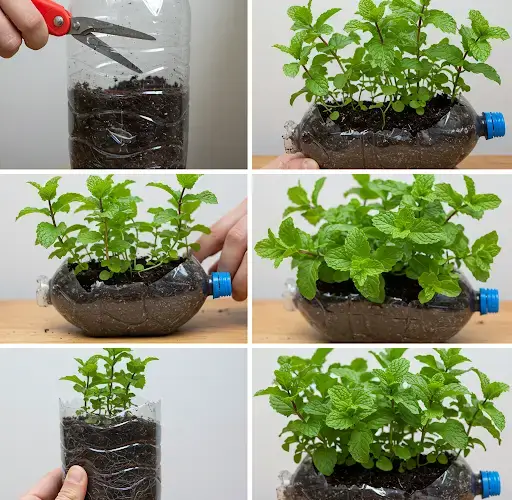
1. Preparing the Plastic Bottle
- Clean the plastic bottle thoroughly and remove the label.
- Cut the bottle in half. The bottom half will be used as the main planter.
- Poke several drainage holes in the bottom to prevent waterlogging.
- If creating a self-watering system, make a small hole in the bottle cap and place a cotton wick through it.
2. Preparing the Soil
- Mint thrives in well-draining, nutrient-rich soil.
- Mix potting soil with compost for extra nutrients.
- Ensure the soil is slightly moist before planting.
3. Planting the Mint
- If using mint cuttings, remove lower leaves and place the stems in water for a few days until roots develop.
- If using seeds, plant them ¼ inch deep and cover lightly with soil.
- Place the planted bottle in a location that receives 4–6 hours of sunlight daily.
4. Creating a Self-Watering System (Optional)
- Fill the bottom part of the bottle with water.
- Place the top half (with soil and plant) upside down into the base, ensuring the wick reaches the water.
- This setup allows the plant to absorb moisture as needed, reducing maintenance.
5. Watering and Care
- Keep the soil consistently moist but avoid overwatering.
- Water deeply when the top inch of soil feels dry.
- If indoors, mist the leaves occasionally to maintain humidity.
6. Fertilizing for Healthy Growth
- Use organic compost tea or diluted fish emulsion every 3–4 weeks.
- Avoid excessive fertilizers, as mint grows vigorously with minimal feeding.
7. Managing Pests and Diseases
- Aphids and Spider Mites: Spray with neem oil or soapy water.
- Fungal Diseases: Ensure proper air circulation and avoid overwatering.
- Slugs and Snails: Use crushed eggshells around the base to deter them.
8. Harvesting Mint
- Start harvesting once the plant has multiple sets of leaves.
- Pick leaves regularly to encourage new growth.
- For continuous production, avoid letting the plant flower; pinch off flower buds as they appear.
Final Thoughts
By using plastic bottles, you can create a self-sustaining, space-saving system to grow mint all year round. Whether you have a small kitchen, balcony, or garden, this method ensures a fresh supply of mint with minimal effort. Try it today and enjoy homegrown mint whenever you need it!
